
Management of Bloods

When dealing with bloods within a practice setting, it is often best practice to make a strategy that all members of the practice use to ensure efficient management. Putting a strategy in place ensures
- Accuracy
- Safety
- Improves time management
As in the Healthone talk on 10/09/2016 in the Crown Plaza, I demonstrated a strategy which the practice I work in has adopted.
For this to work best, we will use the following.
- Mediform (Bloods V4.2). Download it from the website if not on your system.
- Transaction entitled Blood tests
- Add the term Requested tests to the SOAP sequence
- Create an associated list to Requested tests for all the bloods likely to be requested
- Action Plan tab
- SMS text service (Reference: Clanwilliam Support to set this up if not available)
Here I will demonstrate using a Step-by-Step approach how to set it up and how to implement it.
This method works best if all members of the practice follow the same principles.
Step 1
First we need to set up HealthOne to facilitate this method.
- Open the HealthOne Selector Screen and open a Test patient file
- Check within your mediforms
 that you have the following Mediform. (Bloods V4.2)
 - You will need to add your Practice GPs to this mediform. To edit your mediform,
- Click once on the mediform icon, Choose Bloods V4.2. Click once on this form in order to just highlight it. Then click on the Configuration button in the Mediform Selector Box
 Choose Edit Mediform from the drop-down menu.
 - Now you are in the Mediform Designer
- Click on the box beside the Ordered By and in the Value Box change the Drs names to suit your own practice.
- Click Save
- Click once on the mediform icon, Choose Bloods V4.2. Click once on this form in order to just highlight it. Then click on the Configuration button in the Mediform Selector Box
- Now you have your mediform designed to suit your own users.
Step 2
Check that you have a Blood test transaction that you can use. If not you will need to go into the configuration tool to create one.
- In the configuration tool click on Transaction Name icon

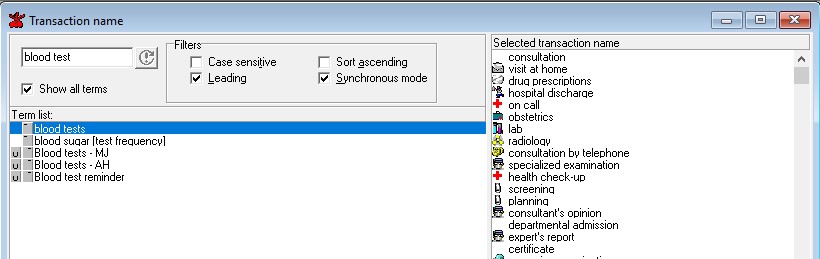
- As shown above, type in Blood tests into the box (Ensure show all terms is ticked)
- Then simply Click & drag the term blood tests across into the Selected transaction name
- Press the X’ in the top right corner. You will be prompted to save.
Step 3
While still in the configuration tool, we now want to create an associated list for the term requested tests
- To do this, click on the associated list icon
- In the Term Box type Requested tests
- Now click Action at the top menu and select Add Group
- This will give you a free group box on the right of the screen.
- Now choose your bloods in the term box and click and drag across to the member box
- Click the ‘X’ and Save
Step 4
Now we can configure the Transaction we have created
- Click on Trs icon at top of screen
- Find the Transaction Name Blood tests from the list of transactions on Rt side.
- Highlight same.
- Now Click on Mediforms tab and find your mediform Bloods V4.2 and click & drag across
(see below)
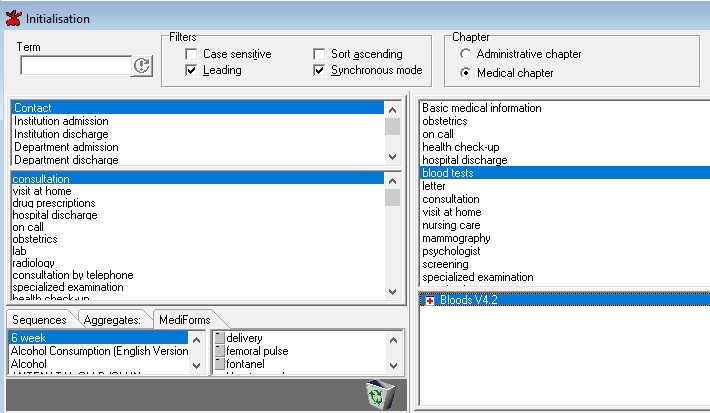
By doing this, every time the Transaction Blood tests is created, the Mediform automatically appears.
Step 5
Finally in the Configuration tool, we need to ensure that the term Requested tests is placed in the sequence Subjective Symptoms. This ensures your GPs enter the requested bloods in this item.
To do this.
- Click on Sequences
- Find the Group Name Subjective Symptoms
- Now in the Term Box in the Lt side of screen, type in Requested tests
- Once you have found the term, Click & drag across to the Member Box
- Close and save.
By using a Test file, you can now check the configuration changes you have made.
- Open John Test
- Create a new Transaction (Blood tests)
- When the transaction opens first you will notice a lines of items. Double-click anywhere on the Transaction Page, and the Mediform in its entirety appears.
- Tick off as appropriate. Check your label printer is configured to print your labels
- Now close the file.
- Right click on the Plan of Action entry and Plan the action as per the dialogue box. By doing this the GP ordering the bloods can check his own bloods and remark on them.
- Close file and save & validate
Step 6
Configure the Action Plan now that you have an entry.
- Choose the Action Plan tab
- In the Item Name field, type in Plan of Action
- Now in the Provider field, Use the Drop-down Menu to choose the appropriate GP
- Once you have created this view, It can be saved by clicking Save Current View as Choose an Identifiable View Name eg: Dr MJ-Bloods
- Advise the GP this is where he can monitor his blood results and remark accordingly.
- For the GP to remark on the results, he can double click on the name in the action plan. This will take him directly to the page. Click on the Page, and the Mediform will once again appear. There is a Tick Box selection for him to choose on the Rt side of the screen. Or he can comment in the box directly below. NB:He should also remark if any blood results are missing in the comment box.
- Crucially now all he must do is Right-Click on the entry he has made. This is stored under the item name Then Plan the action back to the Nurse or whoever is responsible for giving out results.
Step 7
As above, again configure the Action Plan tab to display all the results.
- Choose the Action Plan tab
- In the item name field, type in Results
- In the Provider field, choose the person responsible for handling results from the Drop-down-menu
- Once you have created this view, It can be saved by clicking Save Current View as:
![]() Choose an Identifiable View Name eg: Nurse-Results
Choose an Identifiable View Name eg: Nurse-Results
Another useful trick, is to advise admin staff when taking a call, they can quickly access the Action Plan and use the View Name Nurse-Results to see if the GP has commented on them. If its not there in the action plan, It can be assumed they have not been reviewed.
Step 8
Now to advise the normal results, you can either use Mail Merge from the Action Plan, or use SMS texting to inform them.
To use SMS texting, it is vital that
- You are given permission by the patient to use the mobile for this purpose
- That you have always got the correct number on file (The Mediform facilitates this) You can take the number from the patient when having bloods drawn and document it.
← Ways to manage Blood tests