

Templates (3)

Letter templates are a great way in which to create a document which can be used again and again.
They are used for (but not limited to)
- Referral Letters
- Consent Documentation
- Certificates
- Recall letters
To start creating your letter template
- Click File/New/Template
(Or click ![]() icon on the main menu bar and choose option Template)
icon on the main menu bar and choose option Template)
This will direct you to the ‘Word Processor’ element of HealthOne.
Now you can start to create your Template
At the top of your screen there are a series of menus.
Menu.1
![]()
1. Create your own unique Header/Footer by clicking on Header/Footer icon ![]()
Create the Header within the box at the top of your document. Once you are happy with your Header, move the mouse away from the box and double click to complete. Your Header will now appear ‘greyed out’ If you need to re-edit, simply double click over the Header and it will no longer be grey and therefore is editable
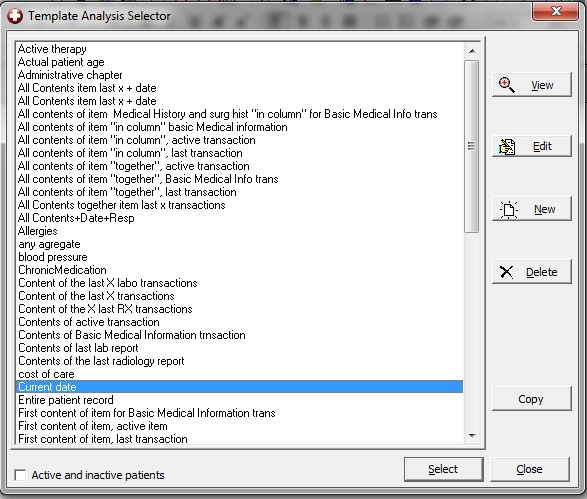
2. Now to add a date field to your template, click on analysis field icon ![]()
A drop down box appears called the Template Analysis Selector Scroll down the list of items in this box to Current Date, highlight same and click select
Changing the Header/Footer of a template is very easy.
Click on File / Open / Template
Once you have opened where all your templates are c:\honewin\config\set1\canevas Choose the template you wish to alter.
Once opened, You will notice the current Header is ‘Greyed Out’ While it is like this it is uneditable.
Click on the header and it is no longer ‘Greyed Out’ You can now edit it as you choose.
To save your changes, move your mouse out of the Header box and double click!! The Header should now have become uneditable again.
Click Save icon ![]()
Mediforms (2)
It is correct that the form does not pull in the previous history for smears, nor does it pull the info about treatment history.
Cervical check specifically requested this, as many practices were putting in far too much information into this. All you need to do is handwrite the last 3 smears which should be visible on the 2nd page of the form (If the information has been entered under the term ‘cervical smear’
The treatment history should also be available in this manner by ensuring the information is correctly entered under the term ‘colposcopy’
It may be necessary to edit or change a mediform which has been released for use. You may need to change details to reflect your own practice.
First of all you need to access the mediform of choice. In order to do this, open any patient file. Its always safer to use a test patient for this process.
For example
FILE ⇒ OPEN ⇒ HCR
The patient selector screen is now available to choose your patient of choice. In this instance we will choose ‘John Test’
Once this file is open, look on the ‘ICON menu over the Transaction box – ![]() Mediform Icon
Mediform Icon
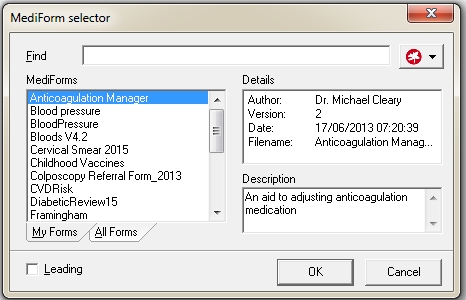
To edit your mediform, you need to click on the ‘Mediform Icon’ and choose the mediform you wish to edit. Once you have chosen the mediform from the Mediform Selector,
To edit click the arrow on the ‘configuration icon’ ![]()
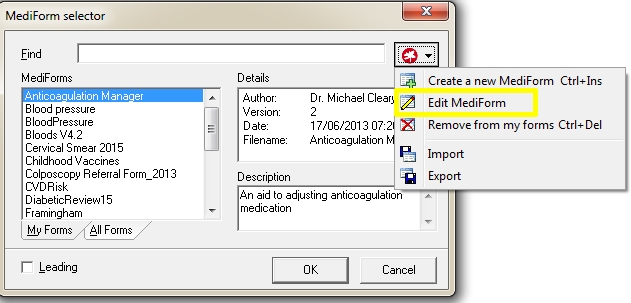
Once you click on EDIT MEDIFORM’ the following ‘Designer Box’ appears.
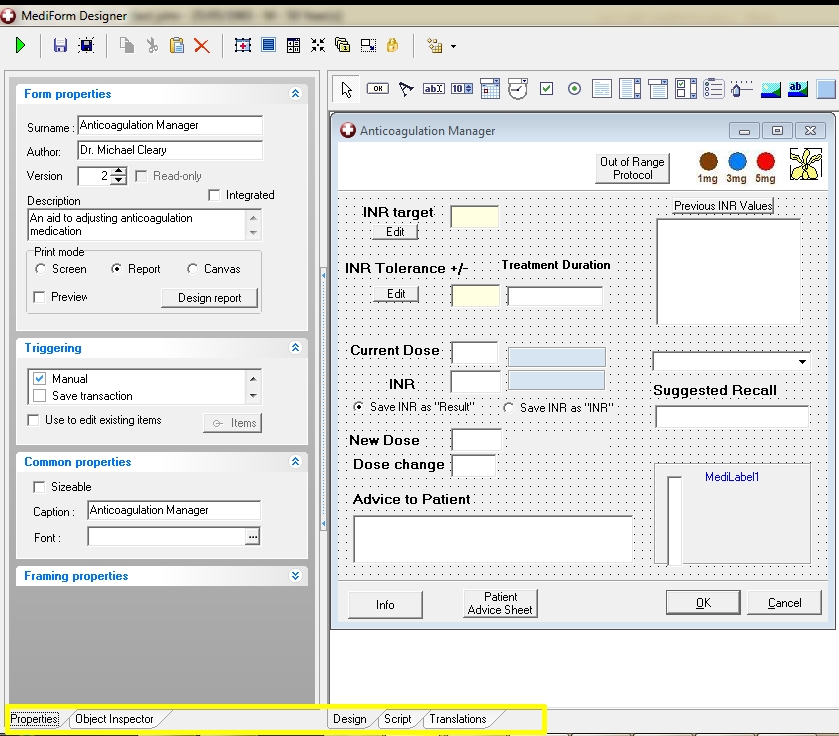
You need to pay particular attention to the lower menu, ensuring you are in the ‘Object Inspector’ Tab The ‘Properties tab’ is used for more advanced changes.
Basically whichever field you need to alter, click on the field which is in the ‘Design’ Tab. Once you click on the appropriate field, you can now edit details of the tab, which can be found in the ‘Object Inspector Tab’ or the ‘Properties’ Tab.
For a more comprehensive document on Mediforms editing, click here
Administration (11)
Management of Bloods

When dealing with bloods within a practice setting, it is often best practice to make a strategy that all members of the practice use to ensure efficient management. Putting a strategy in place ensures
- Accuracy
- Safety
- Improves time management
As in the Healthone talk on 10/09/2016 in the Crown Plaza, I demonstrated a strategy which the practice I work in has adopted.
For this to work best, we will use the following.
- Mediform (Bloods V4.2). Download it from the website if not on your system.
- Transaction entitled Blood tests
- Add the term Requested tests to the SOAP sequence
- Create an associated list to Requested tests for all the bloods likely to be requested
- Action Plan tab
- SMS text service (Reference: Clanwilliam Support to set this up if not available)
Here I will demonstrate using a Step-by-Step approach how to set it up and how to implement it.
This method works best if all members of the practice follow the same principles.
Step 1
First we need to set up HealthOne to facilitate this method.
- Open the HealthOne Selector Screen and open a Test patient file
- Check within your mediforms
 that you have the following Mediform. (Bloods V4.2)
 - You will need to add your Practice GPs to this mediform. To edit your mediform,
- Click once on the mediform icon, Choose Bloods V4.2. Click once on this form in order to just highlight it. Then click on the Configuration button in the Mediform Selector Box
 Choose Edit Mediform from the drop-down menu.
 - Now you are in the Mediform Designer
- Click on the box beside the Ordered By and in the Value Box change the Drs names to suit your own practice.
- Click Save
- Click once on the mediform icon, Choose Bloods V4.2. Click once on this form in order to just highlight it. Then click on the Configuration button in the Mediform Selector Box
- Now you have your mediform designed to suit your own users.
Step 2
Check that you have a Blood test transaction that you can use. If not you will need to go into the configuration tool to create one.
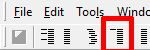
- In the configuration tool click on Transaction Name icon

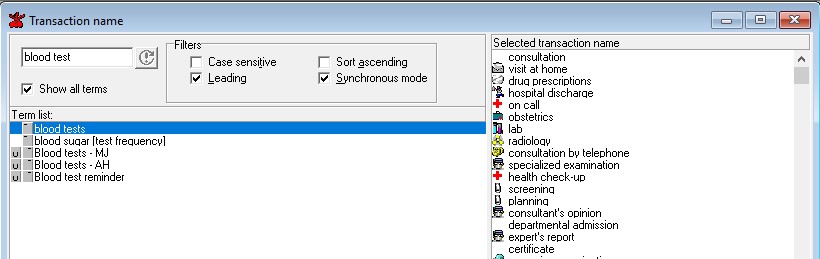
- As shown above, type in Blood tests into the box (Ensure show all terms is ticked)
- Then simply Click & drag the term blood tests across into the Selected transaction name
- Press the X’ in the top right corner. You will be prompted to save.
Step 3
While still in the configuration tool, we now want to create an associated list for the term requested tests
- To do this, click on the associated list icon
- In the Term Box type Requested tests
- Now click Action at the top menu and select Add Group
- This will give you a free group box on the right of the screen.
- Now choose your bloods in the term box and click and drag across to the member box
- Click the ‘X’ and Save
Step 4
Now we can configure the Transaction we have created
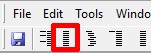
- Click on Trs icon at top of screen
- Find the Transaction Name Blood tests from the list of transactions on Rt side.
- Highlight same.
- Now Click on Mediforms tab and find your mediform Bloods V4.2 and click & drag across
(see below)
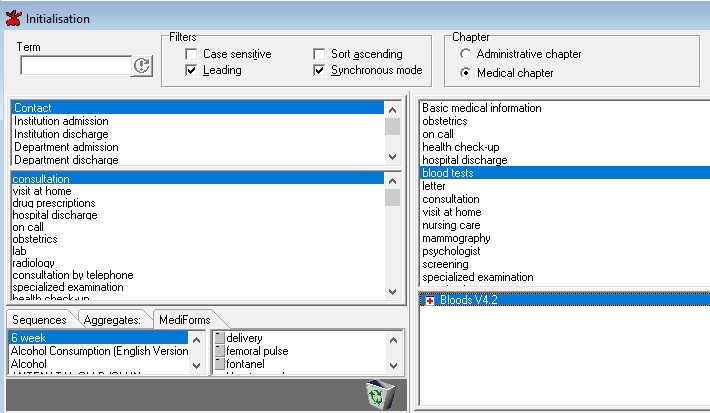
By doing this, every time the Transaction Blood tests is created, the Mediform automatically appears.
Step 5
Finally in the Configuration tool, we need to ensure that the term Requested tests is placed in the sequence Subjective Symptoms. This ensures your GPs enter the requested bloods in this item.
To do this.
- Click on Sequences
- Find the Group Name Subjective Symptoms
- Now in the Term Box in the Lt side of screen, type in Requested tests
- Once you have found the term, Click & drag across to the Member Box
- Close and save.
By using a Test file, you can now check the configuration changes you have made.
- Open John Test
- Create a new Transaction (Blood tests)
- When the transaction opens first you will notice a lines of items. Double-click anywhere on the Transaction Page, and the Mediform in its entirety appears.
- Tick off as appropriate. Check your label printer is configured to print your labels
- Now close the file.
- Right click on the Plan of Action entry and Plan the action as per the dialogue box. By doing this the GP ordering the bloods can check his own bloods and remark on them.
- Close file and save & validate
Step 6
Configure the Action Plan now that you have an entry.
- Choose the Action Plan tab
- In the Item Name field, type in Plan of Action
- Now in the Provider field, Use the Drop-down Menu to choose the appropriate GP
- Once you have created this view, It can be saved by clicking Save Current View as Choose an Identifiable View Name eg: Dr MJ-Bloods
- Advise the GP this is where he can monitor his blood results and remark accordingly.
- For the GP to remark on the results, he can double click on the name in the action plan. This will take him directly to the page. Click on the Page, and the Mediform will once again appear. There is a Tick Box selection for him to choose on the Rt side of the screen. Or he can comment in the box directly below. NB:He should also remark if any blood results are missing in the comment box.
- Crucially now all he must do is Right-Click on the entry he has made. This is stored under the item name Then Plan the action back to the Nurse or whoever is responsible for giving out results.
Step 7
As above, again configure the Action Plan tab to display all the results.
- Choose the Action Plan tab
- In the item name field, type in Results
- In the Provider field, choose the person responsible for handling results from the Drop-down-menu
- Once you have created this view, It can be saved by clicking Save Current View as:
![]() Choose an Identifiable View Name eg: Nurse-Results
Choose an Identifiable View Name eg: Nurse-Results
Another useful trick, is to advise admin staff when taking a call, they can quickly access the Action Plan and use the View Name Nurse-Results to see if the GP has commented on them. If its not there in the action plan, It can be assumed they have not been reviewed.
Step 8
Now to advise the normal results, you can either use Mail Merge from the Action Plan, or use SMS texting to inform them.
To use SMS texting, it is vital that
- You are given permission by the patient to use the mobile for this purpose
- That you have always got the correct number on file (The Mediform facilitates this) You can take the number from the patient when having bloods drawn and document it.
It is possible to limit access to parts of the healthOne system to certain staff. You may decide you need to restrict some staff from having access to a patient file, or a transaction within a file.
You can decide to
- Display/Protect a Transaction – Prevent users from viewing the contents of a transaction
- Display/Protect an entry – Prevent users from viewing an actual entry.
- Display/Protect a complete file
There are times when the details of a consultation should be kept completely confidential,
- It may be that the patient has requested this
- There may be a staff member who is well known to the patient
- There may be a legal necessity to do so.
Either way, HealthOne can ensure that transactions are ‘Display/Protected’.
When a transaction is ‘Display/Protected’ It is clear within the Transaction window that there is a Transaction which has had a ‘Protection’ placed on it.
This is displayed in grey, and has an icon at the side of the transaction similar to a lock ![]()
This means that whoever made the Transaction ‘Display/Protected’, will be the only user who can view the transaction.
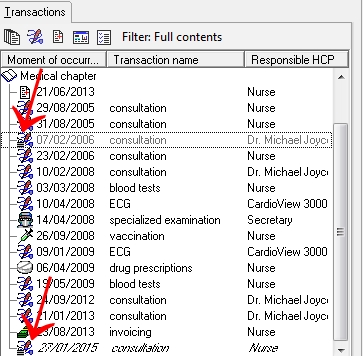
**Both Transactions with red arrows are demonstrations of Display/Protected Transactions
There are a couple of ways you can Display/Protect.
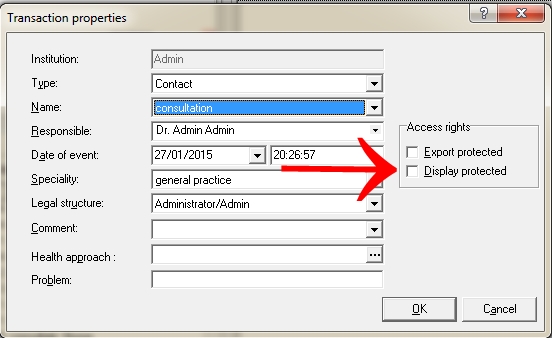
- When creating your transaction you will see from the ‘Transaction Property’ box, there is a ‘TICK’ option. Simply make sure this option is ticked before saving. By doing this, the creator of the Transaction will be the only user able to view the contents. All other users will see a ‘GREY’ transaction
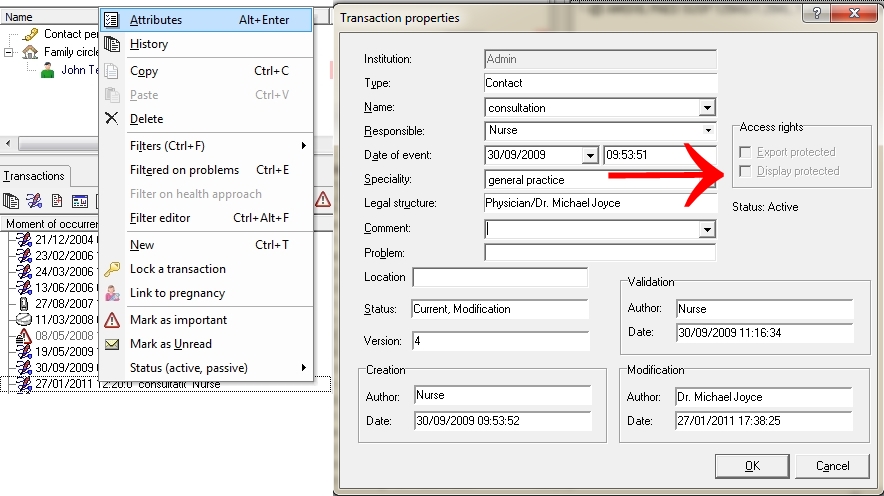
- You can also choose the transaction you wish to display/protect by ‘Right‘ click on the selected transaction. Select ‘Attributes‘ The Transaction property window will open, and you can change the ‘Access rights’ from here
If you are still confused, why not watch the short video demonstration below.
[fvplayer src=”http://hiug.ie/wp-content/uploads/2015/01/HealthOne-Display-Protect-a-Transaction.mp4″ width=”640″ height=”360″ splash=”http://hiug.ie/wp-content/uploads/2015/01/display-protect.jpg”]
Studying your under 6’s
As with all audits the quality of your results is going to depend on the quality of the information that you enter into your system. In particular how you record and keep up to date your GMS patients, and how you separate your practice patients from temporary patients. If you don’t have a system for doing this your results are going to be less accurate. For billing purposes you need to be using the new billing system.
I am going to try and answer 3 questions namely
1: How many under 6’s do I have, how many already have GMS cards and how many don’t.
2: What was my income from private under 6’s in 2013
3: What was my consultation rate for GMS and for private under 6’s in 2013.
[embeddoc url=”http://hiug.ie/wp-content/uploads/2015/06/Under-6-analysis.pdf” viewer=”google”]
This can be done directly from the Patient Selector Window or the Appointments Window.
Patient Selector Window
- Click on File – New – HCR or (Short-Key Ctl N). Alternatively you can click on the ‘New‘ icon at the bottom Right hand side of the Patient Selector Screen
![]()
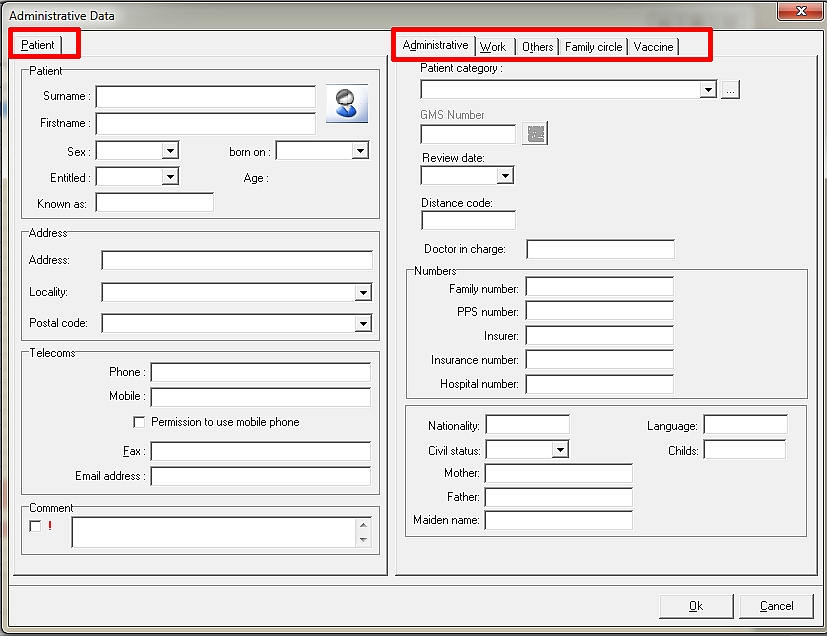
Once you have created a New Patient File you are provided with an Administrative Data Box which can be filled out, ensuring all the demographic details of the patient are completed. You will see on the right hand side of this box, other details which can be filled out including details about their work details, Family details and Vaccination history. It is advisable if possible to gain as much information about your patient at this time and document it in order to optimize the functionality of HealthOne.
Appointment Screen
A New Patient File can be added on the Appointment Screen. To add a New Patient
- Open the Appointment Screen
- Choose the Appointment block you wish to fill
- Right-Click on the appropriate Appointment block
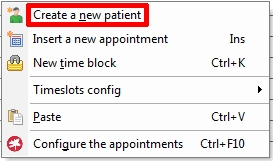
- You will be presented with a dialogue box (see below)
- Choose ‘Create New Patient‘
- You will now be presented with the same Administrative Data box as shown above
For more comprehensive information See the Appointment section in the HealthOne Manual
There are times when as clinicians we need to protect files from being visible to other members of staff. This may be because
- The patient is known to other members of staff
- The patient has asked to keep details of consultation ‘Private & Confidential’
- The content of the consultation could be considered ‘Sensitive’ information.
Whatever the reason, HealthOne can facilitate this with ease.
Follow the video below for instructions
In HealthOne there is the facility available to text patients. It is a system which is similar to the management of a mobile phone online. You need to have an account set up and have credit on that account in order for the SMS text service to work
In order to set this up you need to do the following
- Contact Helix Health Support in order to set up an account.
- They will provide you with Log in details to manage your Credit (this is similar to a Pay-as-you-go facility)
- Add credit to your account
- Commence SMS texting using the following icon within HealthOne
![]()
When you first use the SMS texting system, you can create Templates of frequently sent texts.
For example: You may wish to create a template which advises all blood results have been reviewed and they have been considered within normal parameters. To do this, follow some simple instructions which are outlined on screen.
To activate these frequently used templates, simply click on the arrow beside the template box and highlight the appropriate text body you wish to use.
IMPORTANT: The system only works efficiently once the mobile telephone number has been stored correctly under the term ‘Telephone mobile’ and permission has been granted by the patient to use this facility.
It might be necessary to ensure all administrative staff collect this information and store it correctly under the administrative chapter of the patient file.
In HealthOne there is a facility which allows staff to communicate with each other. This may be necessary in order to pass information on to the appropriate clinican or communicate regarding any form of internal matters.
This is very simple to access while in the patient file. There is also the advantage that if the message involves one of the patients of the practice, a direct link can be added in the message to allow the recipient to access the HCR within the message body.
In order to access this facility, the user simply clicks on the following icon
![]()
If you click on the drop-down arrow, you will be given the option to
- Send message
or given a group of names within the practice.
You can choose the name of the person you wish to send your message and a dialogue box opens, (Similar to any email box).
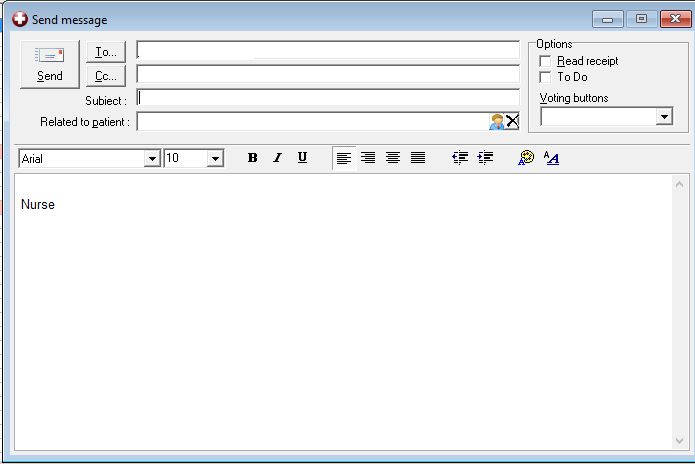
By clicking on the name, this recipient will automatically be added into the To: box
Once you have formulated the body of the email, click on Send to forward your email.
Please note: The Internal messaging facility can be managed by going into Tools/Options/messaging. Here you can chose different parameters, depending on personal choice.
From time to time its useful to be able to identify patients who made appointments and did not attend their scheduled appointment.
Open the configuration tool. ![]()
Click on the alerts icon ![]()
Click on the + cat (bottom left) to create new alert.
Define the age sex Gms status and use the analysis wizard on the same pane to create a search for item: comment operator: contains content: DNA.
Enter the alert message you wish to appear and indicate whether you want alert to appear on file opening, closing, other or all manipulation of file.
Be careful of the logic at this point….tick ‘if alert should be fired’ this is counterintuitive and you may need to play with tick and untick if your alert doesn’t seem to work Save and make sure this alert , to which you will give a name, is enabled in the list of alerts ( tick box)
Now create an item ‘comment’ in the file of an offender . Enter the same text string ie DNA
This patients file should fire an alert when opened .
Sometimes in practice it becomes necessary to do some ‘Spring cleaning’ of our Patient Database. Often patients are not regular patients, either visiting the locality, or have moved and are attending a new GP. HealthOne can separate these patients very easily into an ‘inactive‘ source.
By moving patients into an inactive source, ensures that they wont be included in any Practice Audits. Also the size of the Patient profile is more accurately displayed on screen. (This figure is normally displayed at the bottom Left corner of the Patient Selector Screen.
The inactive source is hard-coded within HealthOne and it cannot be configured. Currently there are the following categories to choose from
- Deceased
- Moved
- Representative
- Archived
- Visitor
Most patients can be categorised using these categories.
In order to change a patient status, as is becoming the norm with HealthOne, it can be accessed at most levels.
You can either access it in the
- Patient Selector Screen – Right-click the chosen patient and choose Change patient status
- Patient HCR – Use the top bar – Choose HCR / Change patient status
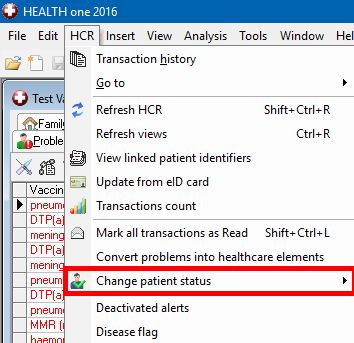
Clicking on ‘change patient status‘ gives the user the available options as outlined above.
Often within practice, patients move to another GP. HealthOne makes the movement of files between HealthOne users very easy to do.
If the practice does not have the HealthOne software, it can still be done but needs to be forwarded using a different method.
HealthOne to HealthOne
In the patient selector choose the patient you wish to transfer notes.
Right-Click on your choice of patient and click on Export
A dialogue box is presented to you in order to confirm Click ok
Then Click Export via Email
You should be presented with your Outlook Contact list. This process will work best with Outlook or Healthmail
(Health Mail is the most secure method to transfer documentation between practices)
Choose your recipient from the contact list provided, or alternatively, enter the email address manually.
Click OK
A dialogue box should now be presented for you to allow/deny the process. If you allow you should see a dialogue box (see below) to verify that the message has been sent. If it has been unsuccessful, there will be notification at this point that there was an error count
Disease Surveillance (8)
In order to verify your GP ID number, you can contact email hidden; JavaScript is required and request details of your number. This number is very important and is used by all the relevant parties. You need this number when you are making your weekly returns, and when you are sending swabs to the NVRL
Searching HealthOne for cases has been simplified in recent years.
All you have to do now is access Tools – Options – Automisation (see below)
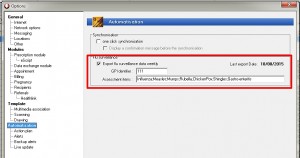
You just need to ensure that the ‘Export Flu Surveillance data Weekly‘ is ticked and that the following Assessment Items are entered.
- Influenza
- Measles
- Mumps
- Rubella
- Chickenpox
- Shingles
- Gastro-enteritis
nb: Each ‘Assessment Item’ is separated by semi-colon (;)
Disease surveillance returns are made on a weekly basis, 52 weeks of the year.
The returns MUST be made by no later than each Tuesday morning by 1pm Any returns which come in any later than this are considered late, and therefore could cost the practice money.
Timeliness is incredibly important to facilitate the Surveillance Network. It ensures accurate, up-to-date data is available at all times. This is vital as part of the implementation of Disease Management Stratagies which the HSE depend on.
Timeliness Pay scale
- A 90% annual return rate for ILI and sentinel diseases from each participant with the following sliding scale qualifications:
- 90% return – incurs a 16% deduction in payment per annum
- 80-89% return – incurs a 24% deduction in payment per annum
- 70-79% return – incurs a 32% deduction in payment per annum
You can access all the data collected throughout the year at NDSC website on their Notifiable diseases webpage
Here you get a comprehensive look at all notifiable disease activity in Ireland including Influenza
Swab material should be used ONLY in conjunction with the Surveillance program. Swab material can be ordered through the NVRL
E-mail email hidden; JavaScript is required making the subject line “Surveillance swabbing request” and in the body of the e-mail specify exactly what you require
- forms
- wire swabs
- viral transport medium
Please include your practice code. Alternatively send the same information by fax to 01 2697611.
NB: PLEASE DO NOT CONTACT THE NVRL BY TELEPHONE. THEY WILL NOT BE ABLE TO HELP YOU!! AS THEY WILL NOT BE AWARE OF WHAT YOU ARE LOOKING FOR.
An important part of the survey is taking swabs, one per week from patients suspected of having the flu.
Swab packs with appropriate instructions are sent out to all participating GPs a couple of weeks prior to the commencement of the Winter Reporting Season (usually around Mid September)
If however your practice is also part of the Vaccine Effectiveness Study different swabbing rules apply. Please see Vaccine Effectiveness Study section…
The Vaccine Effectiveness Study (VE) commenced in 2009 in collaberation with the HPSC, the ICGP and the NVRL.
Having vaccine effectiveness estimates as soon as possible and monitoring the effectiveness along the course of the influenza outbreak is essential to:
- Decide on recommendations for the use of the vaccine
- Target complementary or alternative public health measures (e.g. antivirals) for population subgroups in whom vaccine is less effective
- Allow for precise estimates of the impact of the current vaccination strategies on the burden of disease to support vaccination campaigns
- Trigger further investigation on vaccines (improve composition, use of adjuvants, need for booster doses)
- Better manage and respond to expected reports of vaccine failures
- Counterbalance the reports of adverse events following immunisation by providing elements for an adequate risk management and cost effectiveness analysis.
Further information on the study can be found here
General (1)
All the HealthOne videos are available by either
These videos are produced by the usergroup and retain a copyright of each video. Any attempts to re-distribrute or copy the video content are prohibited unless expressed permission is given the the HIUG
Disease Management (1)
Disease Flags in Health One is an extremely useful tool to identify groups of patients within the database. For example you may wish to flag all your patients who are to be managed in a particular way.
The best example of this is the Diabetic patient cohort who are within the National Diabetes Scheme.
For full information on how to create, and manage these Disease flags, you can follow the video below.
![]()
Vaccinations (3)
There are times when we need to make a new vaccination schedule. This is an extremely useful way to ensure that the correct vaccine protocol is adhered to. For example, vaccines need to be administered at a given time. The vaccine schedule is a method within HealthOne which enables the user to specify the correct dates between each vaccine. eg: Hepatitis B vaccine schedules for travel vaccinations or occupational reasons.
Click on the link above to find out how this can be done.
HealthOne as usual, can make the task of alerting the user to recommend a vaccine is given. This is particularly useful when trying to manage patients who are advised to take certain vaccinations such as influenza vaccines or pneumococcal pneumonia vaccines
Using this function can apply to any vaccine the user wishes to be alerted to.
Childhood vaccinations module is a functionality within HealthOne which is comprehensive, and when used creates a failsafe method of documenting vaccinations given to a baby.
In Version 8.2 (2017) this Module has been updated and improved Click here for more information
Childhood Immunisation Module 2017
Please note: From time to time, the Childhood Vaccinations change and as a result, HealthOne ensure the most up to date Vaccine schedule is ready to use.